What you’ll need ?
- Non-root user with sudo privileges
- Nginx installed and running (serving web pages over HTTP) before continuing with this guide
- DNS
Arecord that points your domain name to the public IP address of your server. This is required since Let’s Encrypt uses this info. to validate that you own the domain for which you are requesting a certificate. For example, if you want to obtain a certificate for example.com, the DNS must resolve to your server’s public IP for the validation process to work.
What you need to do ?
Step 1 : Install the certbot client and the plugin.
Certbot is a fully-featured software by Let’s Encrypt that can automate the tasks of obtaining certificates and configuring webservers to use them. This client runs on Unix-based operating systems.
If you are on Ubuntu/Debian:
On Ubuntu servers, the client is available in a PPA maintained by the Certbot team. Now add the universe and certbot repositories. Use the following commands to install the client & the plugin for Nginx.
sudo apt update
sudo apt-get install software-properties-common
sudo add-apt-repository universe
sudo add-apt-repository ppa:certbot/certbot
sudo apt-get update
sudo apt-get install certbot python3-certbot-nginx
If you are on CentOS/RHEL
To add the EPEL repository on CentOS 8 , run the following command:
sudo dnf install epel-release
Now that you have access to the repository, you can install all the required packages:
sudo dnf install certbot python3-certbot-nginx mod_ssl
Once installed, use the following command to test if the client is working correctly.
sudo certbot --help
If you see a list of all commands & their description, then you are ready to go.
Step 2 : Setup Nginx
If you have satisfied the requirement no. 3 mentioned above (i.e. you have a DNS A record that points your domain name to the public IP address of your server), then you can skip this step & jump to step 3.
Otherwise I assume you are beginning with a fresh installation of Nginx. Since Certbot looks for and modifies the server block in your NGINX configuration, it is necessary to ensure that, there exists a Nginx configuration file for your domain. Let’s assume your domain to be example.com .
Let’s assume your domain to be example.com . Now you need to create a file in the /etc/nginx/sites-enabled/ directory named example.com.conf. Then enter the following:
server {
    listen 80 default_server;
    listen [::]:80 default_server;
    root /var/www/html;
    server_name example.com www.example.com;
}
example.com with your real domain.
Now run the following command which will verify the syntax / check for errors in the example.com.conf file & then reload the new Nginx configuration:
nginx -t && nginx -s reload
nginx: [error] invalid PID number "" in "/run/nginx.pid"then you can use
sudo /etc/init.d/nginx start or simply sudo service nginx start to start the service. Then you have to reload Nginx using nginx -t && nginx -s reload
Step 3 : Obtain SSL certificate
Let’s assume your domain to be example.com . We will use the default NGINX plug‑in for certbot, which takes care of obtaining SSL, reconfiguring NGINX and reloading its configuration.
To run the plugin, enter
sudo certbot --nginx
This should result in a prompt like this:
Enter email address (used for urgent renewal and security notices) (Enter 'c' to
cancel):
You need not worry about spam etc. since your email will be used to contact you for renewal and security purposes.
Next you should see a prompt like this:
- - - - - - - - - - - - - - - - - - - - - - - - - - - - - - - - - - - - - - - -
Please read the Terms of Service at
https://letsencrypt.org/documents/LE-SA-v1.2-November-15-2017.pdf. You must
agree in order to register with the ACME server at
https://acme-v02.api.letsencrypt.org/directory
- - - - - - - - - - - - - - - - - - - - - - - - - - - - - - - - - - - - - - - -
(A)gree/(C)ancel: A
You can read their TOS & then press Aand then ENTER to agree to the TOS.
Then you should see a prompt like this:
- - - - - - - - - - - - - - - - - - - - - - - - - - - - - - - - - - - - - - - -
Would you be willing to share your email address with the Electronic Frontier
Foundation, a founding partner of the Let's Encrypt project and the non-profit
organization that develops Certbot? We'd like to send you email about our work
encrypting the web, EFF news, campaigns, and ways to support digital freedom.
- - - - - - - - - - - - - - - - - - - - - - - - - - - - - - - - - - - - - - - -
(Y)es/(N)o: N
Enter Y or N as per you preference & then press ENTER to proceed.
Then you should see a prompt like this:
Which names would you like to activate HTTPS for?
- - - - - - - - - - - - - - - - - - - - - - - - - - - - - - - - - - - - - - - -
1: example.com
2: www.example.com
- - - - - - - - - - - - - - - - - - - - - - - - - - - - - - - - - - - - - - - -
Select the appropriate numbers separated by commas and/or spaces, or leave input
blank to select all options shown (Enter 'c' to cancel):
You can choose any of them by entering 1 or 2 or leave it blank to select all.
example.com.conf file. If you wish to get SSL for any other subdomain/domain you need to ensure that they are present in example.com.conf file before itself.This is also the reason why you were asked to have Nginx installed and running (HTTP) before continuing with this guide.
After this you should see a prompt like this:
Obtaining a new certificate
Performing the following challenges:
http-01 challenge for example.com
Waiting for verification...
Cleaning up challenges
Created an SSL vhost at /etc/nginx/sites-enabled/example.com.conf
Enabled Apache socache_shmcb module
Enabled Apache ssl module
Deploying Certificate to VirtualHost /etc/nginx/sites-enabled/example.com.conf
Enabling available site: /etc/nginx/sites-enabled/example.com.conf

Please choose whether or not to redirect HTTP traffic to HTTPS, removing HTTP access.
- - - - - - - - - - - - - - - - - - - - - - - - - - - - - - - - - - - - - - - -
1: No redirect - Make no further changes to the webserver configuration.
2: Redirect - Make all requests redirect to secure HTTPS access. Choose this for
new sites, or if you're confident your site works on HTTPS. You can undo this
change by editing your web server's configuration.
- - - - - - - - - - - - - - - - - - - - - - - - - - - - - - - - - - - - - - - -
Select the appropriate number [1-2] then [enter] (press 'c' to cancel):
For maximum security It’s always recommended to enable HTTP to HTTPS redirect. Thus enter 2 followed by enter to enable this.
Finally you should see:
Redirecting all traffic on port 80 to ssl in /etc/nginx/sites-enabled/example.com.conf

- - - - - - - - - - - - - - - - - - - - - - - - - - - - - - - - - - - - - - - -
Congratulations! You have successfully enabled https://example.com

You should test your configuration at:
https://www.ssllabs.com/ssltest/analyze.html?d=example.com
- - - - - - - - - - - - - - - - - - - - - - - - - - - - - - - - - - - - - - - -
Now if you cat your example.com.conf you will see that certbot has modified it to configure SSL for your website
server {
    listen 80 default_server;
    listen [::]:80 default_server;
    root /var/www/html;
    server_name  example.com www.example.com;

    listen 443 ssl; # managed by Certbot

    # RSA certificate
    ssl_certificate /etc/letsencrypt/live/example.com/fullchain.pem; # managed by Certbot
    ssl_certificate_key /etc/letsencrypt/live/example.com/privkey.pem; # managed by Certbot

    include /etc/letsencrypt/options-ssl-nginx.conf; # managed by Certbot

    # Redirect non-https traffic to https
    if ($scheme != "https") {
        return 301 https://$host$request_uri;
    } # managed by Certbot
}
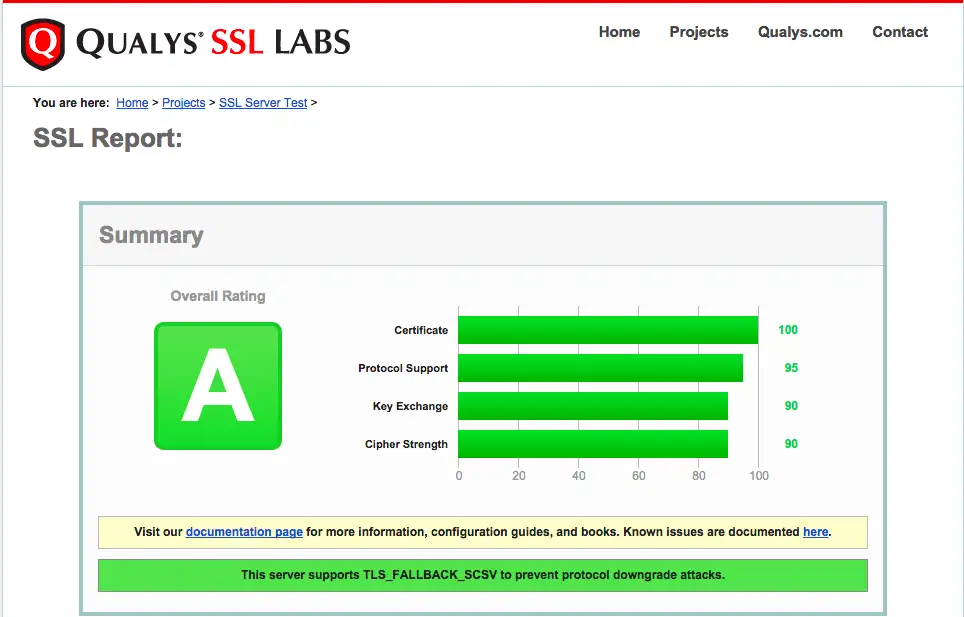
Step 4: Test SSL
You can now go to ssllabs.com/ssltest/ and run an SSL test on your domain.
A successful test should result in a ‘A’ rating.
Step 5: Test auto renewal
SSL Certificates issued by Letsencrypt expire after 90 days. Fortunately you need not do anything.
The certbot package we installed takes care of renewals by including a renew script to /etc/cron.d which runs twice a day and automatically renews any certificate that’s within thirty days of expiration.
In order test the working of this renewal process, you can run:
sudo certbot renew --dry-run
If you see no errors, you’re all set. When necessary, Certbot will renew your certificates and reload Nginx to adopt the changes.
If by any chance the automated renewal process fails, Let’s Encrypt will send a message to the email you specified, warning you abut certificate expiry.
Step 6 (optional): Deny HTTP traffic
After you set up HTTPS, you can optionally deny HTTP traffic (non-secure) on port 80. If you are using UFW (Uncomplicated Firewall) which the default firewall configuration tool for Ubuntu, then use
ufw delete allow 80/tcp
Summary
In this guide, you learnt how to install Let’s Encrypt client certbot, configure it to get an SSL certificate for your domain, and confirmed that Certbot’s automatic renewal service is active.
If you have further questions about using Certbot, you can read their extensive documentation.
References
- Certbot documentation
- Update: Using Free Let’s Encrypt SSL/TLS Certificates with NGINX - from Nginx official website